Showing posts with label diy. Show all posts

Friday, December 9, 2016

DIY Lip Scrub

Now that the cold weather has appeared everything is dry.  I HATE having dry and chapped lips.  It's the worst feeling ever!  While hanging out with one of my friends we decided to make our own lip scrubs.  A lib scrub gets all the dry skin off so when you apply chapstick it actually works.  They can be a bit pricey so this will save you money.  You could even give them as Christmas gifts!  It's SUPER easy and you probably have all the ingredients already!  If you make this tweet me pictures!  Enjoy!


What You Will Need:
2 cups white sugar
½ cup coconut oil
5-7 drops of orange essential oil
A jar with a lid
Pink food coloring

Directions:
1. Begin by mixing the sugar and coconut oil in a bowl. You can use a wooden spoon or food processor.

2. Add in the orange essential oil. You can use any flavor you want.  Also add a few drops of food coloring if you'd like.  Mine is bright pink but you can skip this part if you want.  Continue to mix and blend until the sugar scrub is the consistency you wish.
3. Store the sugar scrub in a glass jar with lid to keep it fresh.  To use your sugar scrub, just apply it to wet skin in a circular motion and rinse.


Friday, October 28, 2016

♥DIY Donut Pumpkin♥

One of my favorite things about Halloween is carving pumpkins.  This year I wanted to do something different.  The new trend is painting pumpkins so that's what I did.  I LOVE donuts!!!  I went to Pinterest to find some inspiration.  I think my pumpkin turned out pretty adorable.  I think next year I'll do a few more.


What You Will Need:
-A pumpkin of any size
-A pencil
-Acrylic Paint (any colors you want)
-Paint brushes

Directions:
1. Pick the pumpkin you want.  I went with a small one so it would be more realistic.
2. Then I took a pencil to outline the frosting.  Take gray paint and go over the outline.
3. Paint the top part of your pumpkin light pink.  Then paint the bottom portion a tan color.
4. After everything is dry use multiple different colors to make sprinkles.


It is that easy!  Did you decorate any pumpkins this year?  I would love to see them!  Tweet me pictures especially if you try this design.


Thursday, October 27, 2016

4 Last Minute Halloween Costumes From Your Closet

Most of us will probably be going to some sort of Halloween party this weekend.  There is no reason to go spend $80 on a costume because all you'll need is your closet.  If you are like me then you probably have no clue what to be.  Don't worry I've got you covered!  I came up with 4 costumes that you already own.  Let's get to it!

First up is a scarecrow.  All you'll need is a plaid shirt, preferably red, some ripped jeans, and brown boots.  You can add makeup and a straw hat if you would like.  All you need is a braid and your look is complete.

Next up is a witch.  All that you will need is a black dress and black boots.  Any dress will work as long it's black so just pick your favorite.  The only thing you'll need to but is a witch hat which is less than $5.  If you are crafty then make your own.

Next is a flower goddess.  You'll need a flowy white dress, sandals, and a flower crown.  Think Coachella vibes or the Snapchat filter.  This my favorite for sure.

Last up is a fitness girl.  All you need are yoga pants, a exercise top, and sneakers.  This is probably the best one.  You can go straight from the gym to your party.  Plus you will be super comfortable all night!

Well that is what I came up with!  What was your favorite?  Also, let me know what you are going to be for Halloween in the comments!


Thursday, October 22, 2015

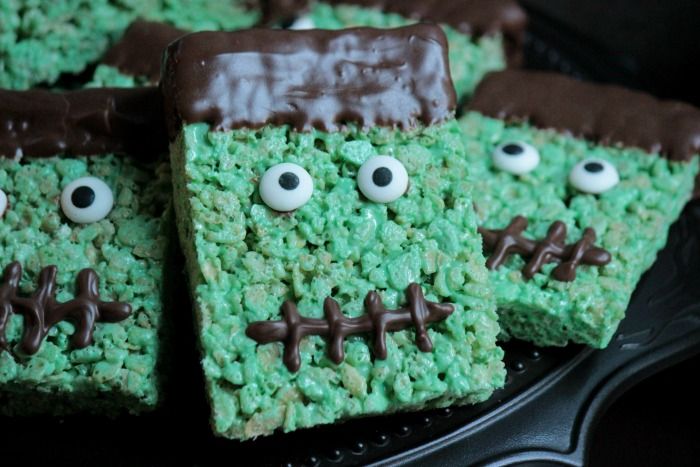
Cooking Corner: Frankenstein Treats

Halloween is only 9 days away!!!!  I'm actually getting super excited.  Today I thought I would share a really cute and easy treat.  This would be perfect for a party or just to enjoy yourself!  I'll probably be enjoying these while I carve pumpkins with my nieces.  Tweet me pictures if you try them out!  Also let me know if you want more Halloween themed posts in the comments.


Ingredients:
3 tablespoons of butter
10 oz of marshmallows
6 cups rice krispie cereal
10 drops yellow food coloring
10 drops blue food coloring
Melted chocolate
Candy eyes

Directions:
1. Melt butter in a pot and add the marshmallows.  Stir until all melted.

2. Add food coloring and stir until the mixture is green.  Add cereal a little at a time and stir until combined.

3. Press cereal mixture evenly into a greased 9 x 13 pan.  Let it cool for about 30 minutes.

4. Cut into squares and remove from pan.

5. Melt the chocolate in a bowl and dip the tops of the rice krispie treats in it.  Set on wax paper to harden.

6. Put some melted chocolate into a ziplock bag and snip off one corner.  Use this to stick on eyes and draw the mouth.

7. Let set for about 20 minutes.  Then enjoy!


xo,
Jerica

Friday, June 12, 2015

Easy Summer Nails

One of my favorite things about summer is painting my nails.  There are just SO many options!  Since it's a gloomy day out I decided to look for a cute but simple nail design on Pinterest.  Now normally the design is a total fail but not today!  This is super easy and perfect for any summer occasion.  It's also very customizable to your style.  I was slightly in a hurry so mine look a bit messy but you'll get the idea.  Send me pictures on Twitter so I can see what you did @jerica_89!


What You'll Need:
White polish
5 different colored polishes
A bobby pin
Clear Coat


Directions:
1.  Paint your nail white using two coats
2.  Decide what 5 colors you want to use.  I did Orange, Pink, Lavender, Light Blue, and Mint Green.  You can choose any you want.
3.  Bend a bobby pin straight and dip into one of the colors.  Dot only the top part of your nail.
4.  Repeat until all nails are complete.  Then add a clear coat.


xo,
Jerica

Thursday, February 12, 2015

3 DIY Face Masks


Welcome to day 4 of my Valentine's Day week posts.  There will be a new Valentine's Day themed post every day this week.  Today's post may not seem very Valentine's but it does.  I'm going to share 3 different DIY face masks.  They are all natural and made with items you already have.  You want your skin to look and feel good before your date.  You could also have a spa night with a bunch of your girlfriends.  Tweet me a picture if you try any of these!

Oatmeal Honey Mask:
Combine 1/2 cup hot water and 1/3 cup oatmeal. After the water and oatmeal have settled for two or three minutes, mix in 2 tablespoons plain yogurt, 2 tablespoons honey, and 1 small egg white. Apply a thin layer of the mask to your face, and let it sit for 10 to 15 minutes. Then rinse with warm water. (Make sure you place a strainer in your sink to avoid clogging the drain)

Yogurt Orange Juice Mask:
Mix 1 teaspoon plain yogurt with the juice from 1/4 slice of orange, some of the orange pulp, and 1 teaspoon aloe. Leave the mixture on your face for at least five minutes before rinsing it off.

Guacamole Mask:
Mash 1/2 of a ripe avocado with 2 tablespoons of honey and apply to the face. Let sit 20+ minutes and rinse well.


xo,
Jerica

Tuesday, December 16, 2014

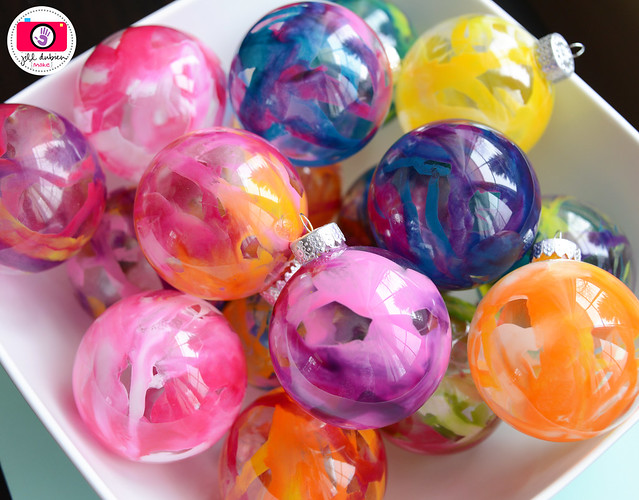
Day 4: DIY Melted Crayon Ornaments


Welcome to day 4 of my 12 days of Christmas!  Today I'm going to share a DIY project that my younger sister and I plan on making.  We haven't actually had time to make them but I'll put the Pinterest picture below.  These look like you spent hours making them but they are super easy.  You can give them as gifts or use them on your own tree.  Let me know if you try it out by tweeting a picture to me @jerica_89.


What you'll need:
1 package of Crayola crayons
Sharp knife
1 package of clear glass ornaments
Hair dryer
A pair of thick gloves


Directions:
1. Take your crayons out of the box and using your knife peel the wrappers from the crayons. Once your crayons are peeled, cut your crayons into small pieces.  You'll need about 6 pieces per crayon.

2. Take the silver top off your ornament and place 3-4 crayon pieces into the ball. Make sure you use glass ornaments because plastic will melt.  Experiment with color combinations and have fun!

3. Put the silver top back on the ornament and put your gloves. Turn your hair dryer on high heat and hold your ornament in your gloved hand. Heat up the crayons until they start to melt and then swirl the ornament around in your hand so the colors swirl all over the inside of the ornament. Don’t melt the crayons completely, it will be too much. Once you are satisfied with the look, turn off the blow dryer.

4. Take the silver top back off the ornament and turn the ornament upside down over a plate or bowl. Turn your hair dryer on once again and heat up the crayons until they fall out of the opening at the bottom and on to your plate or bowl. Put the silver top back on your ornament and that's it!

xo,
Jerica

Monday, October 20, 2014

4 DIY Halloween Costumes

Can you believe Halloween is only 2 weeks away?  If you are like me you probably haven't got a costume yet.  I can't justify spending $30 for only one night and never wear it again.  No worries!  I'm here to help you make a costume using clothing you already own.  These are just ideas that you can use a guide.  You can adapt it depending on what is in your closet.  If you try any of these tweet me a picture @jerica_89!  Let me know if you want more posts like this.

First up is Cleopatra.  All you need is a flowy white dress.  For shoes use gladiator sandals.  Gold is the best color but brown or black will work too.  Go crazy with the gold jewelry!  If you think its too much add more!  The most important is a big statement necklace.  To add some color go for turquoise earrings.  Straighten your hair and wear a gold headband across your forehead.  That's it!

This is my favorite option.  It's Minnie Mouse!  All you need is a red polka dot shirt and high waisted white shorts.  You could also wear a dress as long its red and polka dotted.  Add some black leggings to give more of a mouse effect.  For shoes you'll need yellow heels.  If you have Minnie ears then wear those.  If not wear a polka dotted bow in your hair.  You are now transformed!

Animal costumes are always a good option.  I chose to do a Panda.  All you need is a black and white shirt and some black jeans.  For shoes go with some black and white chucks.  Wear a panda hat and black gloves to finish off the look!

I love superheros!  My favorite is Captain America.  If you own a Captain America shirt wear that but if not wear a flag/american shirt.  Pair it with some dark blue jeans and red chucks.  For accessories wear flag sunglasses and a star read, white, and blue bow.


xo,
Jerica

Tuesday, July 15, 2014

Summer Series 2014: DIY Inspirational Quote Canvas

Hello everybody!  This week I decided to try out my Pinterest skills.  Not every day is sunny during the summer.  Instead of being bored on a rainy day, why not get crafty.  I told you guys I would be posting this series every Saturday morning.  Well, if you haven't noticed it isn't Saturday.  I had a bit of a mess up and had to start over.  Don't worry I will be back on schedule next week.  I promise!  Send me pictures on Twitter @jerica_89 if you attempt this project.


What You'll Need:
- Blank Canvas
- Different Colored Paint
- Large Paint Brush
- Your Favorite Quote
- Stencils


Step 1:
First you'll need to cover your floor with newspaper.  Since there is paint involved you need to protect your carpet.  You could do this outside if it is nice out.  I got this canvas from my younger sister because she does art projects all the time.  You can buy a bigger canvas though.

Step 2:
Next you'll want to create a background on your canvas.  I chose to do dots but you can do anything.  I just took different colored paint and squirted it directly on the canvas.  This gives it more texture.  I did different size dots as well.  Then sit it aside to dry.

Step 3:
Now you'll need to think of your favorite quote.  It can be inspirational or just something that suits your personality.  Next put your stencils on the canvas.  You'll want to lay it out to make sure everything is even and lined up.  I used stencils that had a slightly sticky back so they won't slide around during the next step.

Step 4:
Using your large paint brush, paint over your entire canvas a solid color.  I chose black because I wanted the dots to pop out more.  Depending on what your background is you can choose any solid color that fits it.  I did two coats of black.  Let it dry overnight.

Step 5:
Peel off your stencils carefully.  Then you are left with this!  I love this quote because music is my life.


xo,
Jerica

Wednesday, May 21, 2014

Easy No Heat Headband Curls

Hey everybody!  I recently discovered a super easy way to curl your hair.  All you need is a headband.  Maybe I'm behind on this trend but I thought I would share with you guys.  Now that summer is coming you don't want to use a lot of heat on your hair.  What I love is that you can do this hairstyle while you sleep.  This means you can sleep an extra 10 minutes in the morning.  That's awesome right?  Send me pictures on Twitter if you try it out @jerica_89.  Let's get to it!

Step 1:
Get your hair slightly damp.  If you do this try it tends to not curl as well.  Take a headband and put it directly over your hair and across your forehead.  You can use any size headband depending on what type of curls you want.  I used a thin one for tighter curls.

Step 2:
Take a 1 inch piece and wrap it around the headband.  Make sure to pull tight so you have good curls.  Add another 1 inch piece to the one you just pulled through.  Keep doing this until you do half the headband then start the other side or the headband will start to slip up.

Step 3:
This is what it will look like once you wrap all your hair.  I actually bobby pinned my hair to the headband so make sure it would stay.  That is optional though.  This took about 15 minutes to do.  Now you just wait as long you want.  I left mine in for 2 days just because I have thick hair.

Step 4:
To remove the headband, slowly pull it so the hair unravels.  This is how mine turned out!  You can style any way you want.  I pinned mine in an updo because I was going to a fancy play.  I didn't add any product and it lasted all night!


xo,
Jerica

Thursday, March 20, 2014

Bowtique By Jacqueline Review

Hey guys!  A few weeks ago I met a girl from HCBN who ran Bowtique By Jacqueline.  It is an online Etsy store.  She sells many different items such as hair bows, no crease ponytails, and decals.  I got a circle  monogrammed decal and I love it!  I'll put the picture below.  It comes in multiple colors.  They are Black, White, Hot Pink, or Lavender.  The quality is amazing!  I had no trouble transferring the decal from the paper to where I wanted it.  I chose to place it on my mini fridge because I wanted to brighten it up.  Plus I look at it daily.  You can place the decals inside or outside.  I recommend Jacqueline if you need a good high quality decal.  You can check out her site at https://www.etsy.com/shop/bowtiquebyjacqueline.  Her stores Facebook is https://www.facebook.com/BowtiqueByJacqueline.  Her stores Instagram is http://instagram.com/bowtiquebyjacqueline.  As I mentioned she is part of HCBN.   She blogs at http://www.prettipleaseblog.com.  Here are her blog links: FacebookInstagram, and Twitter.  Go check her out!


xo,
Jerica

Thursday, October 10, 2013

Cooking Corner: Pumpkin Rice Krispie Treats

I am SO excited for Halloween!  I found a really cute recipe to get you in the spirit.  They are Pumpkin Rice Krispie Treats.  It is super easy to do.  These are perfect for a party or just to give out to all your friends.  Tweet me a picture if you make these to my twitter @jerica_89.


Ingredients:
1 Stick Butter
2 (10 oz). Packages Marshmallows
12 C. Rice Crispy Cereal
1 tsp. Yellow Food Color
1/4 tsp. Red Food Color
Green Decorating Icing in Tube
Decorating Tips
Tootsie Rolls

Directions:
1.  In a pot on low heat melt the butter then stir the marshmallows in until they have dissolved.

2.  Next, add the food coloring into the mixture and stir until the mixture is a uniform orange color.

3.  Add Rice Crispy cereal to the mix and stir them until they are completely coated in our marshmallow, food coloring mix.

4.  Shape the mixture into into balls either your hands or a spoon.

5.  Place the balls in the refrigerator and leave there until is has become completely chilled and is form.
6.  Once firm, using the green icing, decorate your pumpkins with leaves and add a tootsie roll as your stem.


xo,
Jerica

Monday, September 30, 2013

DIY Floral Headband

I've been obsessed with the floral headband trend lately.  I just love the boho look.  While shopping I couldn't find any I liked so I thought why not make my own.  You only need about 4 supplies and you can by them all at your local craft store.  Tweet me a picture if you try this out @jerica_89.

What you need:
Elastic Trim
Fake Flowers
Scissors
Hot Glue Gun


Directions:
1.  Measure your head with the trim.  Start from the middle of your forehead and go all the way around your head.  Make sure it is tight enough so it won't slide down.  Cut at the right length.

2.  Arrange your flowers on the trim.  Be as creative as you want.  I prefer covering the entire trim.

3.  Take your hot glue gun and glue your flowers in place.  Make sure you hold each one for about a minute to make sure it stays.  Let it dry completely.

4.  After it is dry, glue the ends together.  Let it dry completely.


xo,
Jerica

Sunday, July 28, 2013

Back To School Series?

Hey guys!  I've been trying to blog a lot more lately and I hope you guys are enjoying it.  Now I want to know your thoughts.  I want to do a back to school series on here but I want ideas from you on what to do.  Tell me in the comments below or you can tweet me at @jerica_89.  You can also email me ideas at jerica.berner@aol.com.  Please let me know your thoughts!


xo,
Jerica

Sunday, February 10, 2013

Be Mine Series: DIY Heart Leggings


I love DIY projects.  I saw a really cute and inexpensive project on YouTube that is perfect for Valentine's Day.  It is heart printed leggings.  You can really customize them however you want.  Send me pictures if you try it out.


What you'll need:
Leggings (can be new or use your favorite pair)
Fabric paint (any color you'd like)
Paint brush
Heart stencil

Steps:

  1. Pour some fabric paint onto a paper plate
  2. Choose which size heart you want from the stencil and lay it on one leg of your leggings
  3. Using the paint brush, fill in the heart completely and continue down the rest of the leg
  4. Let it dry before doing the other leg
  5. Repeat these steps on the opposite leg
You can also do the back if you'd like but it's up to you.  I hope you guys enjoy!  Check back tomorrow!


xo,
Jerica

Monday, February 4, 2013

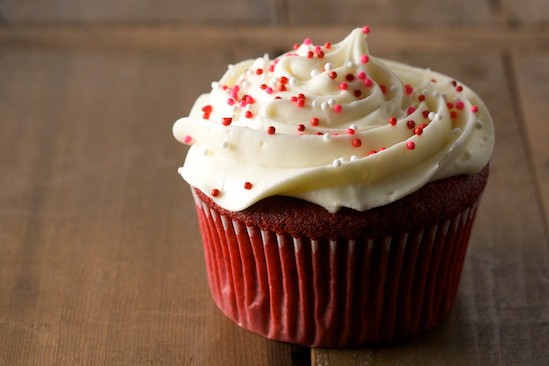
Be Mine Series: Delicious Red Velvet Cupcakes


I love cupcakes!  Most people buy them which is a nice thought.  I find it much more personal if you make your own.  You can make this for anybody.  The recipe is from a Paula Deen cookbook.  To make this more Valentine's Day themed use cupcake liners that have hearts on theme.  This recipe includes a cream cheese frosting.  I use sprinkles as my garnish instead of fruit.  Let me know if any of you bake this.


Ingredients
2 1/2 cups all-purpose flour
1 1/2 cups sugar
1 teaspoon baking soda
1 teaspoon salt
1 teaspoon cocoa powder
1 1/2 cups vegetable oil
1 cup buttermilk, room temperature
2 large eggs, room temperature
2 tablespoons red food coloring
1 teaspoon white distilled vinegar
1 teaspoon vanilla extract

For the Cream Cheese Frosting:
1 pound cream cheese, softened
2 sticks butter, softened
1 teaspoon vanilla extract
4 cups sifted confectioners' sugar
Chopped pecans and fresh raspberries or strawberries, for garnish


Directions
Preheat the oven to 350 degrees F. Line 2 (12-cup) muffin pans with cupcake papers.

In a medium mixing bowl, sift together the flour, sugar, baking soda, salt, and cocoa powder. In a large bowl gently beat together the oil, buttermilk, eggs, food coloring, vinegar, and vanilla with a handheld electric mixer. Add the sifted dry ingredients to the wet and mix until smooth and thoroughly combined.

Divide the batter evenly among the cupcake tins about 2/3 filled. Bake in oven for about 20 to 22 minutes, turning the pans once, half way through. Test the cupcakes with a toothpick for doneness. Remove from oven and cool completely before frosting.

For the Cream Cheese Frosting:
In a large mixing bowl, beat the cream cheese, butter and vanilla together until smooth. Add the sugar and on low speed, beat until incorporated. Increase the speed to high and mix until very light and fluffy.

Garnish with chopped pecans and a fresh raspberry or strawberry.

Cook's Note: Frost the cupcakes with a butter knife or pipe it on with a big star tip.


I hope you guys are enjoying this series!  Come back tomorrow!


xo,
Jerica

Friday, February 1, 2013

Be Mine Series: Decorate Your Room


Welcome to my first ever Valentine's Day series!!!!  I'm excited to share it with you guys.  Every day through Valentine's Day there will be a new post.  It will include recipes, gift guides, date ideas, and more.  Today is all about getting in the spirit.  I love to decorate my room based on whichever holiday is coming up.  Valentine's Day is the easiest because the decorations can be left up all year.  I'm going to share some inexpensive ways to make your room more festive.

1. String of Lights:
This is my favorite decoration.  You can add a string of lights around your window or the headboard.  Some stores actually sell heart shaped lights.  If you you don't want to spend any extra money though you can use what you already have.  Use red or white Christmas lights instead.

2. Window Clings:
This is always my go to item when I'm decorating.  They are super cheap too.  I usually buy mine at the dollar store.  It's so easy to do and a way to be creative.  It will make you feel very festive too.

3. Pillows and Throws:
You can never have enough pillows and blankets.  Some beds can cause your holiday decorations to clash.  So why not just change it up too.  Buy a pink or read throw blanket along with a few heart pillows.  Depending on where you shop will determine the price.  It just gives your an extra Valentine's touch.

4. Picture Heart:
I've been seeing this all over Pinterest lately.  This can be left up no matter what time of the year it is.  All you need to do is print off a bunch of a bunch of your favorite pictures.  It depends on how big you want your heart to be on how many pictures you'll need.  After you have all your pictures printed you need to arrange them on a flat surface into a heart shape.  Once you have your arrangement start taping them on to the wall  exactly the same way.  You final product should be like this:

I hope you all enjoyed my decorating tips!  Check back tomorrow for more!!  Let me know which ones you do.


xo,
Jerica

Monday, December 10, 2012

Cooking Corner: Easy Peppermint Hot Chocolate

Hey guys!  Today I'm sharing a really simple recipe and it's perfect for this time a year.  I am addicted to hot chocolate.  The minute it turns even a little bit cold I start drinking it.  Last year I bought the Peppermint Hot Chocolate from McDonalds and I loved it!  This year I decided to make my own.  While at Target I found Candy Cane Hershey Kisses.  The package looks like this.

These are sooo addicting too!  All you need for this recipe is 2-3 kisses and your favorite hot chocolate mixture.  First make your hot chocolate and pour it into a mug.  Immediately add 2 of the kisses in your mug and stir slowly.  If you want more of a peppermint taste add another kiss.  Finally add your whipped cream and enjoy!  Let me know if you guys try this out!


xo,
Jerica

Monday, August 20, 2012

4 Ways To Glam Up Your Dorm

It's almost fall which means school is back in session.  Dorm rooms can be very plain and boring.  Nobody wants to live a drab place.  So why not add your own style and turn plain into glamorous!  Here are 4 ways to do just that.  Enjoy!


1.  Bedding
Since your bed is a huge part of your dorm then your bedding should set the tone of the room.  Do you want neutral colors or bright crazy patterns?  Your bedding should also reflect your personality.  For me, I'm a very bubbly person so I tend to go toward brighter bedding.  Bright colors can still be classy as long as you don't over do it.  If you want a neutral feel, add a few throw pillows for a pop of color.

This bedding is from pbteen.com and cost $25-$89.  It's bright and fun but not too over the top.
Funky Zebra Organic Duvet Cover & Pillowcases


2.  Pictures
Depending on  where you go to school you may not get to see your family as often.  Having photos of your family and friends will make you feel more at home.  If you prefer hanging your pictures on a cork board then glam it up.  Go to your local craft store and purchase 4-6 squares of cork depending on how big you want your board to be.  Then cover each square with a different fabric using staples.  Using a hot glue gun, glue your squares together to form a giant square.  After it has dried, attach a piece of ribbon to the back so your board can hang on the wall.  Picture frames are also a great way to add decor to your room.

This is collage frame with 10 picture slots.  It cost $34.99 and is from target.com.
Umbra Loft - 10 Opening Collage Frame - Black.Opens in a new window 
3.  Decor
Bare walls are boring and not fun.  Decor should really reflect who you are.  Put posters of your favorite band.  Add a chalk or dry erase board and draw fun designs.  Hang a string of colorful lights around your bed or window.  You can even put up a wall mural.  Just make sure not to make your dorm look cluttered.  
 This wall mural is from pbteen.com and cost $99.
Key West Wall Mural 
 4.  Furniture

The size of your room will determine how much furniture you can add.  A TV is an essential item to have.  You can't spend all your time studying right?  Having a small fridge in your room is nice to keep food or drinks available for whenever you want.  Adding a bean bag or lounge chair is great if you have friends visiting or maybe you just want to lounge while you study.

This peace sign bean bag is also from pbteen.com.  It costs $50-$149 and you can even have it personalized with your name.
 
xo,
Jerica