Showing posts with label easy. Show all posts
Wednesday, June 12, 2019
Weekly Obsession!
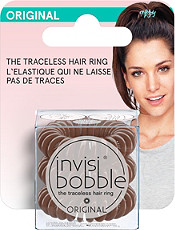
OMG WEEKLY OBSESSIONS ARE BACK!!!!! I love doing this series because I'm ALWAYS discovering new things so I figured why not share it with all of you. We can be obsessed together! Today's weekly obsession....invisibobble!!! I know I'm totally late to the game. If you don't know what these are they are a hair tie that doesn't pull or leave marks in hair. I have really thick hair so I was SURE these wouldn't hold my hair at all. My friend made me try it and I was so shocked!! My hair was damp so I put in a bun and IT STAYED!!!! You guys need to try them especially if you have thick hair. You can buy them anywhere but I picked mine up from Ulta. There are multiple colors as well. The only negative is they cost $9 for a set of 3. What are you guys loving right now?

Friday, July 14, 2017
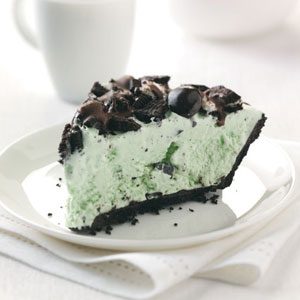
Cooking Corner: Ice Cream Pie
I turn 28 tomorrow!!! I can't even believe I'm going to be that old! I still feel young at heart though. For the last few years one of my friends have made me something and now it's just a tradition. She makes me an Ice Cream Pie and I'm going to share the recipe with you! It is honestly SO EASY!!!!!! You don't even have to cook anything. You can also customize it to whatever flavors you like. I'm just sharing what I get every year. If you make this tweet me a picture or tag me on instagram. Enjoy!!
What You'll Need:
Oreo Pie Crust
Mint Ice Cream
Chocolate Syrup
Directions:
1. Take the pie crust and pack the ice cream into it. Put in the freezer for about 2-3 hours.
2. Before eating top with chocolate syrup and start slicing. Enjoy!
Monday, January 9, 2017
Cooking Corner: Toffee Chip Brownies
I'm back!!!! I took some time off to just enjoy the start of the new year. What a better way to come back then with a baking post. Today I'm sharing the recipe for Heath Brownies!!! I'm SO obsessed with these. I know you are all probably eating healthy but a cheat day is fine. We all deserve it! I found this on the back of the toffee chip bag and I am SO glad I tried it. I will be making these a lot! If you make it tweet me pictures or tag me on instagram. Enjoy!!!
Melt butter and chocolate in medium saucepan over low heat, stirring occasionally. Stir in sugar. Add eggs, one at a time, beating after each addition. Stir in vanilla. Combine flour, baking powder and salt; add to chocolate mixture, stirring until well blended. Spread batter in prepared pan.
Bake 20 minutes or until brownie begins to pull away from sides of pan. Remove from oven; sprinkle with toffee bits. Cover tightly with foil. Cool completely in pan on wire rack. Remove foil; cut into squares.
What You Will Need:
1/3 cup butter or margarine
3 sections (1/2 oz. each) HERSHEY’S Unsweetened Chocolate Baking Bar
1 cup sugar
2 eggs
1 teaspoon vanilla extract
1 cup all-purpose flour
1/2 teaspoon baking powder
1/4 teaspoon salt
1 1/3 cups (8-oz. pkg.) HEATH Milk Chocolate Toffee Bits
Directions:
Heat oven to 350°F. Grease bottom of 8-inch square baking pan.Melt butter and chocolate in medium saucepan over low heat, stirring occasionally. Stir in sugar. Add eggs, one at a time, beating after each addition. Stir in vanilla. Combine flour, baking powder and salt; add to chocolate mixture, stirring until well blended. Spread batter in prepared pan.
Bake 20 minutes or until brownie begins to pull away from sides of pan. Remove from oven; sprinkle with toffee bits. Cover tightly with foil. Cool completely in pan on wire rack. Remove foil; cut into squares.
Friday, December 9, 2016
DIY Lip Scrub
Now that the cold weather has appeared everything is dry. I HATE having dry and chapped lips. It's the worst feeling ever! While hanging out with one of my friends we decided to make our own lip scrubs. A lib scrub gets all the dry skin off so when you apply chapstick it actually works. They can be a bit pricey so this will save you money. You could even give them as Christmas gifts! It's SUPER easy and you probably have all the ingredients already! If you make this tweet me pictures! Enjoy!
What You Will Need:
2 cups white sugar
½ cup coconut oil
5-7 drops of orange essential oil
A jar with a lid
Pink food coloring
Directions:
1. Begin by mixing the sugar and coconut oil in a bowl. You can use a wooden spoon or food processor.
2. Add in the orange essential oil. You can use any flavor you want. Also add a few drops of food coloring if you'd like. Mine is bright pink but you can skip this part if you want. Continue to mix and blend until the sugar scrub is the consistency you wish.
3. Store the sugar scrub in a glass jar with lid to keep it fresh. To use your sugar scrub, just apply it to wet skin in a circular motion and rinse.
Wednesday, December 7, 2016
Weekly Obsession!
Sorry I took a break again! I'm back now I promise! I love sharing my obsessions with you so don't worry. My weekly obsession is........Yes To Coconut Ultra Hydrating Facial Mask!!!!!!!! When I have a stressful week I love to pamper myself. This is perfect for that! I just started getting into skin care and I can't get enough. Before applying this I used a facial scrub to remove any dirt or dead skin. This mask really makes your skin feel extremely smooth. It's very affordable as well which is always nice. I love pretty much anything coconut currently so I knew I would love this. My skin still feels soft after 4 days. It's amazing!!!! Tell me some masks you love and maybe I'll try them.
Friday, November 18, 2016
Cooking Corner: Easy Apple Crisp
Can you believe Thanksgiving is next week already?? It isn't really a huge deal in my family but we do enjoy spending time together. We usually spend the day playing games and eating A LOT. Today I'm going to share the perfect dessert to bring to dinner. A couple weeks ago I had Apple Crisp and became obsessed! My grandma found this recipe on Pinterest and it's SOOO good! You can make adjustments if you prefer. We used different apples and oats. If you make this tweet me pictures. Enjoy!!!
Ingredients:
For the crumb topping:
1/2 cup flour
1/2 cup old fashioned oats
1/2 cup brown sugar
1/2 tsp baking powder
1/4 tsp ground cinnamon
dash of salt
1/3 cup unsalted butter, diced into small chunks
For the Apple filling:
3-4 large Granny Smith apples, peeled and sliced thin
3 Tbsp butter, melted
2 Tbsp flour
1 Tbsp lemon juice
3 Tbsp milk
1/2 tsp vanilla extract
1/4 cup brown sugar
1/2 tsp ground cinnamon
dash of salt
Caramel Sauce (homemade or store bought)
Directions:
1. Preheat oven to 375 degrees F.
2. In a medium size bowl combine the crumb topping ingredients with a fork or pastry blender until it resembles small crumbs. Refrigerate while you prepare the apple filling.
3. For the Apple Filling: In a small bowl, combine melted butter and flour until well blended. Add lemon juice, milk and vanilla and stir well. Stir in brown sugar, cinnamon, and salt. Pour butter mixture over apples and toss to coat. Pour apple mixture into an 8x8-inch baking dish and spread into an even layer. Sprinkle crumb topping evenly over the apples.
4. Bake for 30-35 minutes or until golden brown and top is set. Remove from oven and allow to cool for at least 10 minutes before serving. Add caramel sauce and enjoy!
Friday, October 28, 2016
♥DIY Donut Pumpkin♥
One of my favorite things about Halloween is carving pumpkins. This year I wanted to do something different. The new trend is painting pumpkins so that's what I did. I LOVE donuts!!! I went to Pinterest to find some inspiration. I think my pumpkin turned out pretty adorable. I think next year I'll do a few more.
What You Will Need:
-A pumpkin of any size
-A pencil
-Acrylic Paint (any colors you want)
-Paint brushes
Directions:
1. Pick the pumpkin you want. I went with a small one so it would be more realistic.
2. Then I took a pencil to outline the frosting. Take gray paint and go over the outline.
3. Paint the top part of your pumpkin light pink. Then paint the bottom portion a tan color.
4. After everything is dry use multiple different colors to make sprinkles.
It is that easy! Did you decorate any pumpkins this year? I would love to see them! Tweet me pictures especially if you try this design.
Sunday, July 3, 2016
Cooking Corner: Red, White, and Blue Poke Cake
Can you believe tomorrow is the 4th of July? I'm super excited to spend time with my family and watch fireworks. I wanted to do a patriotic dessert so I headed to Pinterest! I found a really easy Red, White, and Blue Poke Cake. You may also know it as jello cake. They are so good and you can make a ton of different flavors. If you make this tweet me so I can see your cakes! Have an AMAZING 4th!!!!!!!!!!!!
Ingredients:
1 box of white cake mix (plus ingredients on the box)
1 package of red jello
1 package of blue jello
1 tub of Cool Whip
Sprinkles or berries
Directions:
1. Prepare and bake cake in 9X13 pan using directions on the box.
2. Let cake cool for 15 minutes. Use a fork and poke holes all over the cake in rows. You should end up with about 15 rows.
3. Mix red jello with 3/4 cup of boiling water until dissolved. Add 1/2 cup of cold water and pour into every other row of holes.
4. Repeat with the blue jello. Cover your cake and refrigerate for 4 hours or overnight.
5. Spread the Cool Whip on top. Add sprinkles or berries for decoration.
xo,
Jerica
Monday, May 16, 2016
Funfetti Whoopie Pies
Yesterday was my moms birthday and I wanted to make something besides a cake. So I headed to Pinterest! I decided to make Funfetti Whoopie Pies. Everybody loved these! It's a SUPER easy recipe to make. I wasn't a huge fan of the frosting so next time I'll just buy some. I also rolled them in sprinkles but you don't have to. If you make them tweet me pictures. Enjoy!!!!!
Spread between two whoopie pie cookies. I use a heavy ziploc bag, fill it with icing, and cut a whole in the corner of the bag. Then pipe it onto the two cookies.
Frosting:
3 egg whites
3 teaspoons vanilla extract
6 Tablespoons flour
2-4 tablespoons milk
2 1/4 cups crisco
6-7 cups of powdered sugar
Directions:
With electric mixer, whip all ingredients together until the consistency of a thick whipped cream.Spread between two whoopie pie cookies. I use a heavy ziploc bag, fill it with icing, and cut a whole in the corner of the bag. Then pipe it onto the two cookies.
Whoopie Pies:
One Funfetti Cake Mix
Ingredients on the back of the mix
1 1/4 cup flour
Directions:
Beat all ingredients together for two minutes with electric mixer.
Drop by tablespoons full onto greased cookie sheet. (Or cookie sheet lined with parchment)
Bake in a 350*F oven 12-14 minutes or until firm and edges are light golden brown.
Let cool, take two cookies and fill with with whoopie pie frosting!!!
xo,
Jetica
Monday, April 25, 2016
Perfect Spring Outfit
It's officially spring!!! I'm SO happy because I had the winter blues for sure. One Saturday, my mom and I went to see the Phantom of the Opera. We love going to live shows together plus I get to dress up. I really want to do more fashion posts so I thought I'd share my perfect spring outfit. We'll start with my hair.
I really wanted something super easy and simple. So I pulled all my hair to one side and started with a twist. About half way down I started doing a fishtail braid. After I finished the braid I pulled it so it would look thicker and I was done!
I'm obsessed with rompers!! I bought this one from Delia's and I love it! I love the detailing and the tassles. It's part of the festival collection. I wore my black sandals to dress it up a little bit more. I would totally wear sneakers with it though. To finish the look I put on my purple and green sunglasses. They are just so cool and I love the shape.
If you want more posts like this then let me know!
xo,
Jerica
I really wanted something super easy and simple. So I pulled all my hair to one side and started with a twist. About half way down I started doing a fishtail braid. After I finished the braid I pulled it so it would look thicker and I was done!
I'm obsessed with rompers!! I bought this one from Delia's and I love it! I love the detailing and the tassles. It's part of the festival collection. I wore my black sandals to dress it up a little bit more. I would totally wear sneakers with it though. To finish the look I put on my purple and green sunglasses. They are just so cool and I love the shape.
If you want more posts like this then let me know!
xo,
Jerica
Friday, February 12, 2016
Cooking Corner: White Chocolate Strawberry Blondies
This is part two of my Valentine's Day baking ideas. Yesterday I shared Strawberry No Bake Cookies. Since I have a party tomorrow I needed to bring treats. I LOVE brownies so I searched Pinterest for some festive ones. I found the perfect recipe! Today's recipe is White Chocolate Strawberry Blondies. Blondies are just a vanilla brownie. In our case they will be pink! If you make these tweet me pictures. Enjoy!
Combine first four ingredients in a large bowl. Add the milk slowly. You want the cake batter to be as dense & thick possible. Mix in the white chocolate chips.
Pour the batter into the prepared baking pan and bake for 25-30 minutes until edges are just turning brown.
Allow to cool for at least 30 minutes so the center sets, then melt your white chocolate chips and drizzle them on top of the bars, if you choose. Once the bars and the melted chocolate have cooled, cut your blondies using a serrated knife.
Ingredients:
1 box Strawberry Cake Mix
1/2 cup Canola Oil
1 Egg
1/3 cup Milk
3/4 cup White Chocolate Chips
1/2 cup White Chocolate Chips (For Drizzling)
Directions:
Preheat oven to 350°F. Spray an 11x7 inch baking pan with nonstick spray. Set asideCombine first four ingredients in a large bowl. Add the milk slowly. You want the cake batter to be as dense & thick possible. Mix in the white chocolate chips.
Pour the batter into the prepared baking pan and bake for 25-30 minutes until edges are just turning brown.
Allow to cool for at least 30 minutes so the center sets, then melt your white chocolate chips and drizzle them on top of the bars, if you choose. Once the bars and the melted chocolate have cooled, cut your blondies using a serrated knife.
xo,
Jerica
Thursday, February 11, 2016
Cooking Corner: Strawberry Milk No Bake Cookies
Valentine's Day is only a few days away!!! I'm actually going to a party so I needed treats to make. So I headed to my favorite site Pinterest to find something yummy. I found two so come back tomorrow for that one! Today's recipe requires no baking so it's going to be super easy. Today's recipe is Strawberry Milk No Bake Cookies. I did Healthy No Bake Chocolate Cookie awhile ago but these are pink and more festive. If you make these tweet me a picture so I can see. Enjoy!
Let boil for two minutes.
Remove from heat and stir in remaining ingredients until evenly blended.
Drop large spoonfuls on wax paper to cool and harden.
Ingredients:
2 cups Sugar
3/4 (1 1/2 Sticks) Butter
2/3 cup Milk
1 tsp Vanilla Extract
1 – 3.9 oz pkg Instant Vanilla Pudding Mix
4 cups Minute Oats
3/4 cup Strawberry Milk Powder Mix
3/4 (1 1/2 Sticks) Butter
2/3 cup Milk
1 tsp Vanilla Extract
1 – 3.9 oz pkg Instant Vanilla Pudding Mix
4 cups Minute Oats
3/4 cup Strawberry Milk Powder Mix
Directions:
Melt butter, milk, and sugar in a large pot on medium-high heat.Let boil for two minutes.
Remove from heat and stir in remaining ingredients until evenly blended.
Drop large spoonfuls on wax paper to cool and harden.
xo,
Jerica
Thursday, January 21, 2016
Cooking Corner: Non Sloppy Sloppy Joes
One of my favorite meals has always been sloppy joes. They are just a classic dish but they are very messy. My mom found a recipe that I like to call Non Sloppy Sloppy Joes. I'm obsessed with them! I have two small nieces and these are perfect for kids. I figured I'd share since the Super Bowl is coming up. These would be perfect for any party though. If you make these send me a picture on Twitter. Enjoy!
Heat oven to 375° F. In large skillet, cook ground beef over medium-high heat until beef is thoroughly cooked, stirring frequently; drain. Stir in sauce and chili powder; simmer 5 minutes.
Press each biscuit into 6-inch round. Spoon 1/3 cup meat mixture and about 1 tablespoon cheese onto center of each round. Fold dough in half over filling; press to seal. Place on ungreased cookie sheet.
Ingredients:
1 lb lean (at least 80%) ground beef, cooked, drained
1 can (15 oz) sloppy joe sauce
1 teaspoon chili powder
1 can (16.3 oz) Pillsbury Grands refrigerated biscuits
1/2 cup shredded cheddar cheese (2 oz)
Directions:
Heat oven to 375° F. In large skillet, cook ground beef over medium-high heat until beef is thoroughly cooked, stirring frequently; drain. Stir in sauce and chili powder; simmer 5 minutes.
Press each biscuit into 6-inch round. Spoon 1/3 cup meat mixture and about 1 tablespoon cheese onto center of each round. Fold dough in half over filling; press to seal. Place on ungreased cookie sheet.
Bake 9 to 14 minutes or until golden brown.
xo,
Jerica
Thursday, October 22, 2015
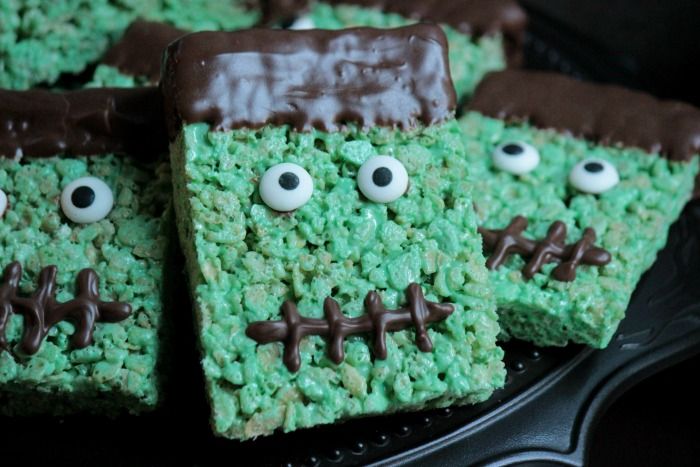
Cooking Corner: Frankenstein Treats
Halloween is only 9 days away!!!! I'm actually getting super excited. Today I thought I would share a really cute and easy treat. This would be perfect for a party or just to enjoy yourself! I'll probably be enjoying these while I carve pumpkins with my nieces. Tweet me pictures if you try them out! Also let me know if you want more Halloween themed posts in the comments.
Ingredients:
3 tablespoons of butter
10 oz of marshmallows
6 cups rice krispie cereal
10 drops yellow food coloring
10 drops blue food coloring
Melted chocolate
Candy eyes
Directions:
1. Melt butter in a pot and add the marshmallows. Stir until all melted.
2. Add food coloring and stir until the mixture is green. Add cereal a little at a time and stir until combined.
3. Press cereal mixture evenly into a greased 9 x 13 pan. Let it cool for about 30 minutes.
4. Cut into squares and remove from pan.
5. Melt the chocolate in a bowl and dip the tops of the rice krispie treats in it. Set on wax paper to harden.
6. Put some melted chocolate into a ziplock bag and snip off one corner. Use this to stick on eyes and draw the mouth.
7. Let set for about 20 minutes. Then enjoy!
xo,
Jerica
Friday, October 2, 2015
Cooking Corner: Quick And Easy Pumpkin Muffins
It's finally October!!!!! You know what that means...PUMPKIN TIME!!!!!! I've been waiting until October to post a recipe that I'm obsessed with. It's Pumpkin Muffins!!! My mom and I discovered it last year and now we eat them every morning. Sadly we can only have them around this time of year. They are SUPER easy because it only requires two ingredients. Yes, TWO INGREDIENTS! Once you make them more often, you can add spices to fit your taste. If you make them tweet me pictures. Enjoy!
What You'll Need:
1 Box of Vanilla Cake Mix
1 Can of Pumpkin Pie filling
Directions:
1. Preheat your oven to 350 degrees. Line your muffin pan with cupcake liners.
2. Dump cake mix and filling into a medium bowl and mix together.
3. Scoop the mixture into cupcake liners
4. Bake for 20-25 minutes. Let them cool and enjoy!
*You can eat them plain or top them with whatever you like. I do Cool Whip or Cinnamon Sugar!*
xo,
Jerica
Monday, June 29, 2015
Cooking Corner: Layered Pistachio Dessert
Since the 4th of July is only days away I thought I would share a recipe we make every year. It doesn't fit the color scheme but it's really good! It brings back so many childhood memories because my grandma would make this dessert at least once a week. It honestly my favorite thing that my grandma makes. It's the perfect summer dessert! If you make this recipe send me pictures on Twitter @jerica_89.
Beat Cool Whip, cream cheese and confectionery sugar with electric mixer; spread over cooled crust.
Beat pudding mix and milk well with electric mixer on low setting. Let mixture stand until set. Then carefully spread over cream cheese layer.
Cover and refrigerate for one hour. Slice into 2" x 2" pieces.
What You'll Need:
1 1/2 cups flour
3/4 cup melted butter
1 cup nuts finely chopped
1 (8 ounce) container Cool Whip
1 (8 ounce) package cream cheese
1 cup confectioner sugar
2 (8 ounce) packages pistachio pudding mix
3 cups milk
Directions:
Press flour, butter, and nuts into a 13" x 9" pan and bake at 350 degrees for 20 minutes. Allow to cool.Beat Cool Whip, cream cheese and confectionery sugar with electric mixer; spread over cooled crust.
Beat pudding mix and milk well with electric mixer on low setting. Let mixture stand until set. Then carefully spread over cream cheese layer.
Cover and refrigerate for one hour. Slice into 2" x 2" pieces.
Store in refrigerator.
xo,
Jerica
Monday, May 25, 2015
Cooking Corner: Chocolate Peanut Butter Bars
Happy Memorial Day! I hope you all had a nice day. I just relaxed with family. I LOVE sweets so I decided to make a recipe I found on Pinterest. They are called Chocolate Peanut Butter Bars. They are super simple and you probably have all the ingredients already. Everybody loves them! It would be perfect to bring to a party or BBQ because you can't really go wrong with peanut butter and chocolate. If you make this tweet me pictures @jerica_89. Enjoy!
Ingredients:
2 cups quick-cooking oats
1 3/4 cups firmly packed light brown sugar
1 1/2 cups All Purpose Flour
1 teaspoon baking powder
1/2 teaspoon baking soda
1 cup butter
1/2 cup chopped peanuts
1 cup (6 oz. pkg.) semi-sweet chocolate chips
1 large egg, beaten
1 (14 oz.) can Sweetened Condensed Milk
1/2 cup Creamy Peanut Butter
Directions:
1. Heat oven to 350°F.
2. Combine oats, brown sugar, flour, baking powder and baking soda in large bowl. Cut in butter with pastry blender or 2 knives until mixture resembles fine crumbs. Stir in peanuts.
3. Reserve 1 1/2 cups crumb mixture. Stir egg into remaining crumb mixture. Press onto bottom of 13 x 9-inch baking pan. Bake for 15 minutes.
4. Stir together sweetened condensed milk and peanut butter in small bowl until well combined. Pour evenly over partially baked crust.
5. Stir together reserved crumb mixture and chocolate chips. Sprinkle evenly over peanut butter layer.
6. Bake for an additional 15 minutes. Cool. Cut into bars.
xo,
Jerica
Wednesday, April 29, 2015
Weekly Obsession!
Happy Wednesday! I love so many different things. This week I'm sharing something I honestly can't get enough of. My weekly obsession is...Fiber One Streusel Bars!
OMG you guys these are amazing!!!!!! They come in strawberry or blueberry flavors but I prefer the strawberry. My friend actually introduced me and I'm so glad I tried one. They have an oatmeal bottom, then a strawberry jam layer, and finally topped with brown sugar crumbles. They are only 150 calories and 20% of your daily fiber intake. I will eat one for breakfast if I'm not that hungry or just throw one in my bag to have as a snack. If you are looking for a healthier snack idea then check these out!
xo,
Jerica
Tuesday, April 21, 2015
Quiz Tuesday: Which U.S. City Should You Live In Based On Your Zodiac Sign?
Happy Tuesday! It's quiz time!!! One thing I love is horoscopes. I try to read it daily but I occasionally forget. I'm not always a firm believer but it's still fun. That is why I chose this weeks quiz. It's called Which U.S. City Should You Live In Based On Your Zodiac Sign? I'm excited to see what I get. If you want to take this quiz as well you can click here. Share your results in the comments!
I got Dallas. The description says You’re sensitive, nurturing, and loyal. As a family-oriented individual, you’ll be at home in a city known for its family-friendly nature — like Dallas, Texas, consistently ranked in the top five American cities for families.
I'm gonna have to agree with these results. I've never been to Dallas but I'd love to. Maybe I'll go one day!
xo,
Jerica
Tuesday, March 17, 2015
Quiz Tuesday: Which Fictional ’90s Girl Is Your BFF?
Happy St. Patrick's Day! This is one of my favorite holidays. I hope you all stay safe as well! Today's quiz is all about the 90's...again. I just really love the 90's! It's called Which Fictional ’90s Girl Is Your BFF? I can't wait to see who I get because let's be honest the 90's had a lot of great BFF's. You can take the quiz with me here.
I got Romy and Michele from Romy & Michele’s High School Reunion. The description says: You, Romy, and Michele would become an inseparable trio thanks to your shared love of pop culture, fashion, and FUN. Could you imagine any two people more awesome to hang out with? You’d make crazy clothes, marathon old TV shows, and take amazing road trips. Watch out Tuscon, here we come!
This pretty much describes me and my cousin. She is honestly my BFF! We have actually done all three things mentioned. Who did you get? Let me know!!!
xo,
Jerica
Subscribe to:
Posts (Atom)